The HTTP specification includes request methods other than the standard GET and POST requests. A standards compliant web server may respond to these alternative methods in ways not anticipated by developers. Although the common description is 'verb' tampering, the HTTP 1.1 standard refers to these request types as different HTTP 'methods.'
The full HTTP 1.1 specification defines the following valid HTTP request methods, or verbs:
OPTIONS
GET
HEAD
POST
PUT
DELETE
TRACE
CONNECT
If enabled, the Web Distributed Authoring and Version (WebDAV) extensions permit several more HTTP methods:
PROPFIND
PROPPATCH
MKCOL
COPY
MOVE
LOCK
UNLOCK
However, most web applications only need to respond to GET and POST requests, providing user data in the URL query string or appended to the request respectively. The standard <a href=""></a> style links trigger a GET request; form data submitted via <form method='POST'></form> trigger POST requests. Forms defined without a method also send data via GET by default.
Oddly, the other valid HTTP methods are not supported by the HTML standard . Any HTTP method other than GET or POST needs to be called outside the HTML document. However, JavaScript and AJAX calls may send methods other than GET and POST.
As long as the web application being tested does not specifically call for any non-standard HTTP methods, testing for HTTP verb tampering is quite simple. If the server accepts a request other than GET or POST, the test fails. The solutions is to disable all non GET or POST functionality within the web application server, or in a web application firewall.
If methods such as HEAD or OPTIONS are required for your application, this increases the burden of testing substantially. Each action within the system will need to be verified that these alternate methods do not trigger actions without proper authentication or reveal information about the contents or workings web application. If possible, limit alternate HTTP method usage to a single page that contains no user actions, such the default landing page (example: index.html).
How to Test
As the HTML standard does not support request methods other than GET or POST, we will need to craft custom HTTP requests to test the other methods. We highly recommend using a tool to do this, although we will demonstrate how to do manually as well.
Manual HTTP verb tampering testing
This example is written using the netcat package from openbsd (standard with most Linux distributions). You may also use telnet (included with Windows) in a similar fashion.
1. Crafting custom HTTP requests
Each HTTP 1.1 request follows the following basic formatting and syntax. Elements surrounded by brackets [ ] are contextual to your application. The empty newline at the end is required.
In order to craft separate requests, you can manually type each request into netcat or telnet and examine the response. However, to speed up testing, you may also store each request in a separate file. This second approach is what we'll demonstrate in these examples. Use your favorite editor to create a text file for each method. Modify for your application's landing page and domain.
For each method and/or method text file, send the request to your web server via netcat or telnet on port 80 (HTTP):
nc www.example.com 80 < OPTIONS.http.txt
3. Parsing HTTP responses
Although each HTTP method can potentially return different results, there is only a single valid result for all methods other than GET and POST. The web server should either ignore the request completely or return an error. Any other response indicates a test failure as the server is responding to methods/verbs that are unnecessary. These methods should be disabled.
An example of a failed test (ie, the server supports OPTIONS despite no need for it):
Automated HTTP verb tampering testing
If you are able to analyze your application via simple HTTP status codes (200 OK, 501 Error, etc) - then the following bash script will test all available HTTP methods.
#!/bin/bash

for webservmethod in GET POST PUT TRACE CONNECT OPTIONS PROPFIND;

do
printf "$webservmethod " ;
printf "$webservmethod / HTTP/1.1\nHost: $1\n\n" | nc -q 1 $1 80 | grep "HTTP/1.1"

done
Http Verb Tempering: Bypassing Web Authentication and Authorization
What is an HTTP VERB?
Hypertext transfer protocol (HTTP) gives you list of methods that can be used to perform actions on the web server. Many of these methods are designed to help developers in deploying and testing HTTP applications in development or debugging phase. These HTTP methods can be used for nefarious purposes if the web server is misconfigured. Also, some high vulnerability like Cross Site Tracing (XST), a form of cross site scripting using the server’s HTTP TRACE method, is examined.
In HTTP methods, GET and POST are most commonly used by developers to access information provided by a web server. HTTP allows several other method as well, which are less known methods.
Following are some of the methods:
HEAD
GET
POST
PUT
DELETE
TRACE
OPTIONS
CONNECT
Many of these methods can potentially pose a critical security risk for a web application, as they allow an attacker to modify the files stored on the web server, delete the web page on the server, and upload a web shell to the server which leads to stealing the credentials of legitimate users. Moreover, when rooting the server, the methods that must be disabled are the following:
PUT: This method allows a client to upload new files on the web server. An attacker can exploit it by uploading malicious files (e.g. an ASP or PHP file that executes commands by invoking cmd.exe), or by simply using the victim’s server as a file repository.
DELETE: This method allows a client to delete a file on the web server. An attacker can exploit it as a very simple and direct way to deface a web site or to mount a Denial of Service (DOS) attack.
CONNECT: This method could allow a client to use the web server as a proxy
TRACE: This method simply echoes back to the client whatever string has been sent to the server, and is used mainly for debugging purposes of developers. This method, originally assumed harmless, can be used to mount an attack known as Cross Site Tracing, which has been discovered by Jeremiah Grossman.
If an application requires any one of the above mentioned, such as in most cases REST Web Services may require the PUT or DELETE method, it is really important to check that their configuration/usage is properly limited to trusted users and safe environment.
Many web environments allow verb based authentication and access control (VBAAC). This is basically nothing but a security control using HTTP methods such as GET and POST (usually used). Let’s take an example to make you understand better.
In the above example, the rule is limited to the /auth directory to root role only. However, this limitation can be bypasses using HTTP verb tempering even after limited/restricted access to the mentioned role. As we can see, the above mentioned configuration has only restricted the same using GET and POST methods only.
We can easily bypass this with the use of the HEAD method; you can also try any other HTTP methods as well such as PUT, TRACK, TRACE, DELETE, etc. Also, you can try to bypass the same by sending arbitrary strings such as ASDF as an HTTP verb (method).
Following are some conditions where bypassing is possible:
It has GET functionality that is not idempotent or execute an arbitrary HTTP Method
It uses a security control that lists HTTP verbs
The security control fails to block HTTP methods that are not listedThese are the most common scenarios where you can bypass the same. It also depend upon rule misconfiguration.
HTTP Verb Tampering is an attack that exploits vulnerabilities in HTTP verb (also known as HTTP method) authentication and access control mechanisms. Many authentication mechanisms only limit access to the most common HTTP methods, thus allowing unauthorized access to restricted resources by other HTTP methods.
Detailed Description
Many Web server authentication mechanisms use verb-based authentication and access controls. Such security mechanisms include access control rules for requests with specific HTTP methods. For example, an administrator can configure a Web server to allow unrestricted access to a Web page using HTTP GET requests, but restrict POSTs to administrators only. However, many implementations of verb-based security mechanisms enforce the security rules in an unsecure manner, allowing access to restricted resources by using alternative HTTP methods (such as HEAD) or even arbitrary character strings.
For example, Java Platform Enterprise Edition (Java EE) supports verb-based authentication and access control through the web.xml configuration file. In Java EE, one can limit access to the admin/ directories for “admin” users by adding the following to web.xml:
These security rules ensure that GET or POST requests to admin/ directories from non admin users will be blocked. However, HTTP requests to admin/ directories other than GET or POST will not be blocked. While a GET request from a non admin user will be blocked, a HEAD request from the same user will not. Unless the administrator explicitly configures the Web server to deny all methods other than GET and POST, the access control mechanism can be bypassed simply by using different methods that are supported by the server. Other examples of Web servers that are affected by this issue include IIS 6.0, Apache 2.2.8, and TomCat 6.0.
In some Web servers–for example, Apache 2.2/PHP–it is even possible to bypass the access control mechanism by using arbitrary character strings for HTTP methods. Such Web servers implement default handlers for requests that are not bound to a specific HTTP method. Unlike an HTTP Servlet where a GET request is only handled if a doGet() is defined, some Web servers attempt to process any and all methods including unknown methods. Thus, by replacing a legitimate method with an arbitrary one (MPRV instead of GET) the attacker can exploit vulnerabilities in the internal processing logic and bypass the access control mechanism.
HTTP Verb Tampering Prevention
Verb tampering attacks exploit either configuration flaws in the access control mechanism or vulnerabilities in the request handlers’ code. As presented in the example above, blocking requests that use non-standard HTTP methods is not enough because in many cases an attacker can use a legitimate HTTP method like HEAD.
Imperva SecureSphere combines two mitigation techniques to detect and stop verb tampering attacks. In the first, SecureSphere learns which methods are allowed for each URL. Any attempt to use HTTP methods that are not part of the application’s normal usage will be detected and blocked. The second technique detects non-standard HTTP methods and blocks requests using such methods. In cases where the application uses non-standard methods normally, this mechanism can be easily updated with the allowed methods.
CRUD in HTML, JavaScript, and jQuery Using the Web API
i show You Howmanipulate data in an HTML table using only JavaScript and jQuery. There were no post-backs, so the data didn’t go anywhere. In this article, you’ll use the same HTML and jQuery, but add calls to a Web API to retrieve and modify product data. It isn’t necessary to go back and read the previous article; this article presents all of the HTML and the calls to work client-side and add the server-side code as well. I’ll be using Visual Studio and .NET to build the Web API service, but the client-side coding is generic and can call a Web API built in any language or platform.
This article focuses on the four standard HTTP verbs that you use to work with the Web API: GET, POST, PUT, and DELETE. The GET verb retrieves a list of data, or a single item of data. POST sends new data to the server. The PUT verb updates an existing row of data. DELETE sends a request to remove a row of data. These verbs are used to map to a method you write in your Web API controller class. It’s up to you to perform the retrieval of data, adding new rows, and updating and deleting of rows of data. Let’s see how all of this works by building a project step-by-step.
Create a Product Information Page
If you’re using Visual Studio, create a new ASP.NET Web Application project. Select "Empty" for the project template as you don’t want any MVC, Web Forms, or even the Web API at this point. Add a new HTML page and name it Default.html. Open the Manage NuGet Packages dialog to add Bootstrap to your project. Bootstrap isn’t necessary for the demo, but it does make your page look nicer.
Open up Default.html and drag the bootstrap.min.css file, the jQuery-1.9.1.min.js file, and the bootstrap.min.js files into the <head> area of the page, as shown in the following code snippet.
<!DOCTYPE html>< htmlxmlns="http://www.w3.org/1999/xhtml">< head ><title></title><linkhref="Content/bootstrap.min.css"rel="stylesheet" /><scriptsrc="Scripts/jquery-1.9.1.min.js"></ script ><scriptsrc="Scripts/bootstrap.min.js"></ script ></ head >< body ></ body ></ html >
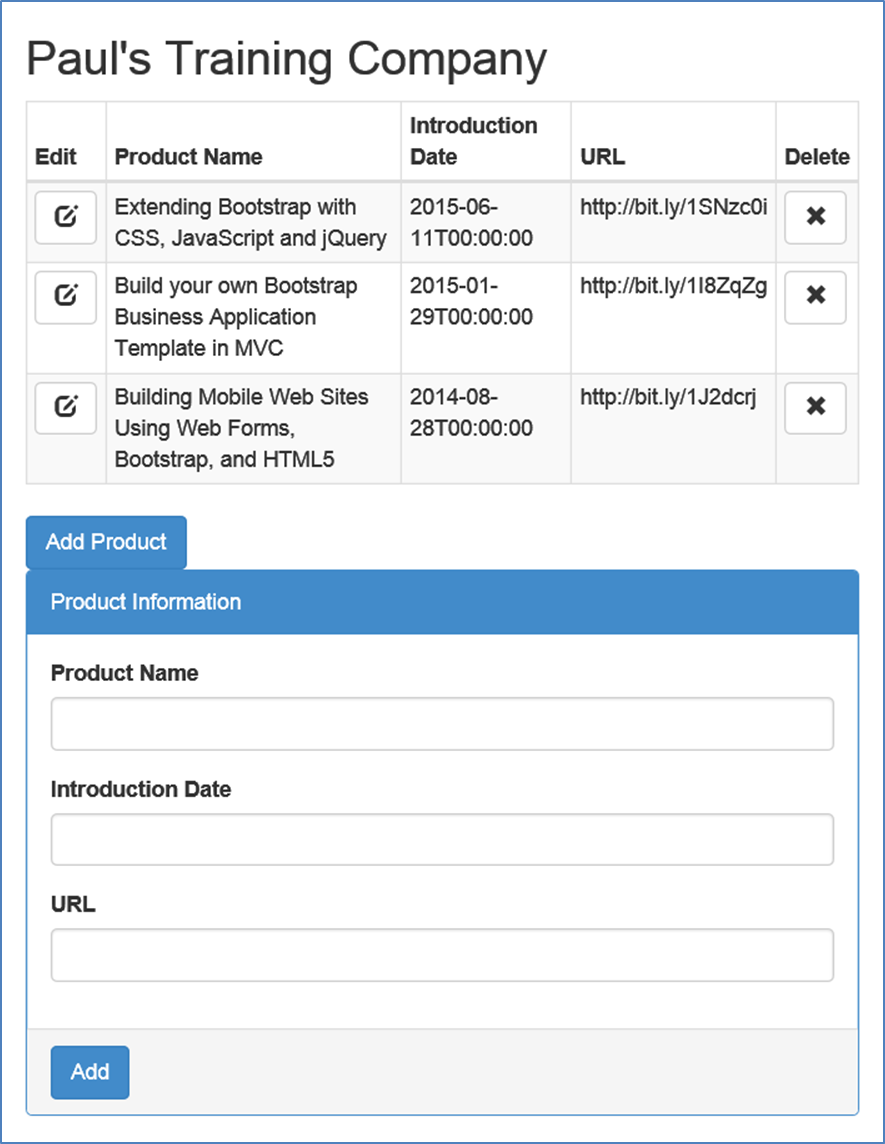
In the <body> tag of this page, build the Web page that looks like Figure 1. Add a Bootstrap container, and a row and column within the <body> element.
Figure 1: Use a product information page to list, add, edit, and delete data.
Add an <h2> element with the words Paul’s Training Company (or substitute your name).
<body><divclass="container"><divclass="row"><divclass="col-sm-6"><h2>Paul’s Training Company</h2></div></div></div></body>
Immediately below the row you just added, create another row, and within that row, build the skeleton of an HTML table. Just build the header for the table, as you’ll build the body dynamically in JavaScript using data retrieved from your Web API. To learn more about building a table dynamically in JavaScript, please read my last article entitled "CRUD in HTML, JavaScript, and jQuery".
In Figure 1, you can see an "Add Product" button immediately below the table. This button is used to clear the input fields of any previous data so that the user can add new product data. After entering data into the input fields, the user clicks on the "Add" button to send the data to the Web API. Build this "Add Product" button by adding another Bootstrap row and column below the previous row. In the onClick event for this button, call a function named addClick. You haven’t created this function yet, but you will later in this article.
To create the product input area you see in Figure 1, the individual fields are placed inside a Bootstrap panel class. The panel classes are ideal to make the input area stand out on the screen separate from all other buttons and tables. A Bootstrap panel consists of the panel wrapper, a heading, a body, and a footer area made out of <div> tags.
All label and input fields are placed within the "panel-body" <div> tag. To achieve the input form look, use the Bootstrap <div class="form-group"> around the label and input fields. Use the "for" attribute on the <label> and include class="form-control" on each of your input types to achieve the correct styling.
The final piece of the input form is the Add button that you place into the panel-footer <div> tag area. This input button’s text changes based on whether or not you’re doing an add or edit of the data in the input fields. The JavaScript code you write checks the text value of this button to determine whether to POST the data to the Web API or to PUT the data. A POST is used for adding data and the PUT is used to update data. Again, there’s a function name in the onClick event that you haven’t written yet, but you will.
If you run the Default.html page now, it should look similar to Figure 1, except there will be no listing of product data.
Add the Web API to Your Project
Now that you have your HTML page built, it’s time to add on the appropriate components within Visual Studio so you can build a Web API to retrieve and modify product data. In Visual Studio, this is easily accomplished using the Manage NuGet Packages dialog, as shown in Figure 2. Search for the "Microsoft ASP.NET Web API 2.2" package and click the Install button to add the appropriate components to your Web project.
Figure 2: Use the Manage NuGet Packages screen to add the Web API to your project.
To create an endpoint for your Web API, create a controller class. Create a new folder called \Controllers in your project. Right-click on the Controllers folder and select Add | Web API Controller Class (v2.1). Set the name of your new controller to ProductController.
Next, you need to specify the routing for your Web API. Create a new folder called \App_Start in your project. Add a new class and name it WebApiConfig. Add a Using statement at the top of this file to bring in the namespace System.Web.Http. Add a Register method in your WebApiConfig class.
publicstaticclassWebApiConfig {publicstaticvoidRegister(
HttpConfiguration config){
config.Routes.Clear();
config.Routes.MapHttpRoute(
name: "DefaultApi",
routeTemplate: "api/{controller}/{id}",
defaults: new
{ id = RouteParameter.Optional }
);
}
}
Clear the Routes collection in case there are any default routes created by .NET. The route, api/{controller}/{id}, that is specified in the MapHttpRoute method is very standard for Web API projects. However, feel free to change this to whatever you want. For example, you could just use {controller}/{id} if you don’t want to have to specify apiin front of all your calls. This is just a matter of preference. However, as most developers have an existing Web project that they’re adding API calls to, it makes sense to have a different route for your API calls. This keeps them separate from the route of your Web pages, which is typically "views."
The last thing you need to do before you can start calling your Web API is to register this route so that your Web application running on your Web server will recognize any call made to your API. Right-click on your project and select Add | New Item… | Global Application Class. This adds a Global.asax file to your project. At the top of the global application class, add the following using statement.
usingSystem.Web.Http;
Within the Application_Start event, add a call to the Register method of the WebApiConfig class that you created earlier. ASP.NET creates an instance of an HttpConfiguration class and attaches it as a static property of the GlobalConfiguration class. It is to this configuration object that you’ll add to the routes you wish to support in your Web application.
You now have a Web page and all the plumbing for the Web API ready to go. Let’s start building your first API call to return a list of product objects to display in the table on the HTML page. Create a class called Product in your project and add the following properties.
Instead of worrying about any database stuff, you can just create some mock data to learn how to work with the Web API. Open the ProductController class and add a private method to create mock data, as shown in Listing 1.
Return Values from API Calls
If you look at the ProductController, you’ll see methods that look like Listing 2. The problem with these methods is that each one returns a different type of value or no value at all. This means that if you want to return HTTP status codes like a 200, 201, 404, etc. you have to write extra code. If you want to return error messages back to the client, you have to change the return value on each of these.
Introduced in the Web API 2 is a new interface called IHttpActionResult. This interface is built into the ApiController class (from which your ProductContoller class inherits) and defines Helper methods to return the most common HTTP status codes such as a 202, 201, 400, 404, etc. The methods you’ll use in this article are Ok, Created<T>, and NotFound. These methods return 200, 201, and 404 respectively. The Ok and Createdmethods allow you to pass data back so you can include things like collections of products or a new product object.
Get (GET) All Products
Let’s start by modifying the GET method to return all products created in the mock data collection. Locate the GET method that has no parameters in the ProductController class, and modify the code to look like the following.
[HttpGet()]public IHttpActionResult Get() {
IHttpActionResult ret = null;
List<Product> list = new List<Product>();
list = CreateMockData();
ret = Ok(list);
return ret;
}
Modify the return value of the GET method to use the new IHttpActionResult interface. Although it’s not necessary, I like adding the attribute [HttpGet()] in front of the method to be very explicit about which HTTP verb this method supports. Declare a variable named ret, of the type IHttpActionResult. Declare a variable named list, to hold a collection of product objects. Build the list of data by calling the CreateMockData method that you defined earlier. Set the ret variable to the Ok method built into the ApiController class, passing in the list of product objects. The Ok method does a couple of things; it sets the HTTP status code to 200, and it includes the list of products in the HttpResponseMessage sent back from this API call.
Call the GET Method
With the GET method created to return a list of products, you can now call it from your HTML page. Open the Default.html page and add a <script> tag at the bottom of the page just above the </body> tag. You know that you have to create at least two functions right away because they were the ones you called from the buttons you defined in the HTML. Add these two function stubs now.
<script>// Handle click event on Update buttonfunctionupdateClick() {
}
// Handle click event on Add buttonfunctionaddClick() {
}
</script>
Add a new function called productList to make the Ajax call to the GET method that you created.
functionproductList() {
// Call Web API to get a list of Product
$.ajax({
url: '/api/Product/',
type: 'GET',
dataType: 'json',
success: function (products) {
productListSuccess(products);
},
error: function (request, message, error) {
handleException(request, message, error);
}
});
}
In this Ajax call, there are two additional functions that you need to write. The productListSuccess function processes the collection of products returned when you successfully retrieve the data. The handleException function takes the error information and does something with it. The productListSuccess function is very simple and uses the jQuery $.each() iterator to loop over the collection of product objects.
functionproductListSuccess(products) {
// Iterate over the collection of data
$.each(products, function (index, product) {
// Add a row to the Product table
productAddRow(product);
});
}
The productAddRow function called from within the iterator is responsible for building a new row to add to the HTML table.
functionproductAddRow(product) {
// Check if <tbody> tag exists, add one if notif ($("#productTable tbody").length == 0) {
$("#productTable").append("<tbody></tbody>");
}
// Append row to <table>
$("#productTable tbody").append(
productBuildTableRow(product));
}
Notice that you first check to ensure that the <tbody> tag exists on the table. This ensures that any <tr> elements you add go into the correct location in the DOM for the table. The function to build the actual <tr> is in a function called productBuildTableRow. This is in a separate function because you’ll use this later in this article to build a row for editing a row in a table.
The last function to add is handleException. If an error occurs, display the error message information in an alert dialog. You can figure out how you want to display error messages later, but for now, you only want to see the error details.
Run the HTML page, and if you’ve done everything correctly, you should see your mock product data displayed in the HTML table. What’s really neat about this is that you didn’t have to use MVC, Web Forms, PHP, or any other Web development system. You simply use an HTML page to call a Web API service.
Modify the GET Method
The GET method you wrote earlier assumes that you successfully retrieved a collection of data from your data store. However, when you retrieve data from a database table, you may have an empty table. In this case, you need to respond back to the front-end client that no data was found. In this case, the list variable would be an empty list. If no data is returned, you should send back a 404 status using the NotFound method. Modify the GET method to look like the following.
[HttpGet()]public IHttpActionResult Get() {
IHttpActionResult ret = null;
List<Product> list = new List<Product>();
list = CreateMockData();
if (list.Count > 0) {
ret = Ok(list);
}
else {
ret = NotFound();
}
return ret;
}
Get a Single Product
When you wish to edit a product, you call the Web API to retrieve a single product object to ensure that you have the latest data from the database, and then display that data in input fields to the user. The user then modifies that data and posts it back. You’ll learn how update data later in this article, but for now, let’s see how to get a single product into the HTML input fields.
Open the ProductController and locate the second Get method, the one that accepts a single parameter named id. Modify that function to look like Listing 3. Because you’re using mock data, go ahead and build the complete collection of products. Locate the productid using LINQ to search for the ID passed into the method. If the product is found, return an Ok and pass the product object to the Ok method. If the product is not found, return a NotFound.
Add an Edit Button to Each Row of the Table
Each row of data in the HTML table should have an edit button, as shown in Figure 1. The raw HTML of the button looks like the following, but of course you have to build this code dynamically so you can get the data- attribute assigned to the correct product id in each row.
Within the <td>, build a button control. Add an onClick to call a function named productGet. Pass in this to the productGet function so that you have a reference to the button itself. You’re going to need the reference so you can retrieve the value of the product ID you stored into data-id attribute.
To simplify the code for this article, I concatenated the HTML values together with the data. You could also use a template library, such as Underscore or Handlebars, to separate the HTML markup from the data.
Make an Ajax Call to Get a Single Product
In Listing 4, you can see the productGet function that you need to add to your <script> on your HTML page. In this function, you retrieve the product ID from the data-idattribute you stored in the edit button. This value needs to be passed to the Get method in your controller and it needs to be kept around for when you submit the data back to update. The best way to do this is to create a hidden field in your HTML body.
<inputtype="hidden"id="productid" value="0" />
You’re now ready to call the Get(id) method in your ProductController. Add the function productGet within your <script> tags, as shown in Listing 4. The Ajax call is very similar to the previous call you made, but the product ID is included on the URL line. This extra ID is what maps this call to the Get(id) method in your controller. If the Get method succeeds in returning a product object, call a function named productAddToFields and pass in the product object. Change the update button’s text from "Add" to "Update." This text value will be used later when you’re ready to add or update data.
The productToFields function uses jQuery to set the value of each input field with the appropriate property of the product object retrieved from the API call.
Run this sample and ensure that you can retrieve a specific product from your API.
Add (POST) a New Product
You used the GET verb to retrieve product data, so let’s now learn to use the POST verb to add a new product. In the ProductController class, to call the Post method. Modify the Post method by adding an [HttpPost()] attribute and changing the return value from void to IHttpActionResult. Change the parameter to the Post method to accept a Product object. You don’t need the [FromBody] attribute, so go ahead and delete that. The [FromBody] attribute is only needed for simple data types, such as string and int.
[HttpPost()]
public IHttpActionResult Post(Product product) {
  IHttpActionResult ret = null;
  if (Add(product)) {
    ret = Created<Product>(Request.RequestUri +
         product.ProductId.ToString(), product);
  }
  else {
    ret = NotFound();
  }
  return ret;
}
The Add method is a mock method to simulate adding a new product. This method calculates the next product ID for the new product and returns a Product object back to the Web page with the new ID set in the ProductId property.
privateboolAdd(Product product){
int newId = 0;
List<Product> list = new List<Product>();
list = CreateMockData();
newId = list.Max(p => p.ProductId);
newId++;
product.ProductId = newId;
list.Add(product);
// TODO: Change to ‘ false ’ to test NotFound()returntrue;
}
Add a New Product in HTML
With the Post Web API method written, you can write the necessary JavaScript in Default.html to call this method. Define a new JavaScript object called Product with the following name/value pairs.
Each of the names in this JavaScript object needs to be spelled exactly the same as the properties in the Product class you created in C#. This allows the Web API engine to map the values from the JavaScript object into the corresponding properties in the C# object.
Each of the names in this JavaScript object needs to be spelled exactly the same as the properties in the Product class you created in C#.
The user fills in the blank fields on the screen, then click the Add button to call the updateClick function. Modify this function to create a new Product object and retrieve the values from each input field on the page and set the appropriate values in the Product object. Call a function named productAdd to submit this JavaScript object to the Post method in your API.
The productAdd function uses Ajax to call the Post method in the Web API. There are a couple of changes to this Ajax call compared to the GET calls you made earlier. First, the type property is set to POST. Second, you add the contentType property to specify that you’re passing JSON to the API. The last change adds a data property where you take the JavaScript Product object you created and serialize it using the JSON.stringify method.
If the call to the Post method is successful, a new product object is returned from the Web API. In the success part of the Ajax call, pass this object to a function called productAddSuccess. Add the newly created product data to the HTML table by calling the productAddRow function you created earlier. Finally, clear the input fields so that they’re ready to add a new product.
The formClear function uses jQuery to clear each input field. You should also change the addClick function to clear the fields when the user clicks on the Add button.
At some point, a user is going to want to change the information about a product. Earlier in this article, you added an Edit button to retrieve product data and display that data in the input fields. The function also changes the updateButton’s text property to Update. When the user clicks on the Update button, take the data from the input fields and use the HTML verb PUT to call the Put method in your Web API. Modify the Put method in your ProductController to look like the following.
[HttpPut()]public IHttpActionResult Put(intid,
Product product) {
IHttpActionResult ret = null;
if (Update(product)) {
ret = Ok(product);
}
else {
ret = NotFound();
}
return ret;
}
The call to the Update method from the Put method is a mock to simulate modifying data in a product table. To see the NotFound returned from this method, change the true value to a false value in the Update method shown below.
privateboolUpdate(Product product){
returntrue;
}
Edit and Submit the Product Data
With your Put method in place, it’s now time to modify the updateClick() function in your JavaScript. Locate the updateClick() function and add an else condition to call a function named productUpdate.
function updateClick() {
  ...
  ...
  if ($("#updateButton").text().trim() ==
            "Add") {
    productAdd(Product);
  }
  else {
    productUpdate(Product);
  }
}
The productUpdate function is passed the product object, and you’ll send that via an Ajax call using the verb PUT. This maps to the Put method you created in the controller. Just like you did in the POST Ajax call, change the type property to PUT, set the contentType to use JSON and serialize the Product object using JSON.stringify.
If the update is successful, a function called productUpdateSuccess is called and passed the updated product object. The productUpdateSuccess function passes the product object on to another function named productUpdateInTable. I know that you could just call the productUpdateInTable function directly from the Ajax call, but I like to keep my pattern of naming functions consistent. Besides, in the future, you may want to do some additional coding within the productUpdateSuccess function.
The productUpdateInTable function locates the row in the HTML table just updated. Once the row is located, a new table row is built using the productBuildTableRow function that you created earlier. This newly created row is inserted immediately after the row of the original data. The original row is then removed from the table. All of this happens so fast that the user doesn’t even realize when this add and delete occur. Another option is to clear the whole table and reload all of the data by calling the productList function.
functionproductUpdateInTable(product) {
// Find Product in <table>var row = $("#productTable button[data-id='" +
product.ProductId + "']").parents("tr")[0];
// Add changed product to table
$(row).after(productBuildTableRow(product));
// Remove original product
$(row).remove();
formClear(); // Clear form fields// Change Update Button Text
$("#updateButton").text("Add");
}
Delete (DELETE) a Product
The last HTTP verb you need to learn is DELETE. Once again, you need to modify the ProductController. Locate the Delete method and modify it by adding the [HttpDelete] attribute, and changing the return value to IHttpActionResult.
[HttpDelete()]public IHttpActionResult Delete(intid) {
IHttpActionResult ret = null;
if (DeleteProduct(id)) {
ret = Ok(true);
}
else {
ret = NotFound();
}
return ret;
}
The DeleteProduct method is a mock to simulate deleting a product from a table. Just create a dummy method that returns true for now. You can switch this method to return false to test what happens if the delete fails.
privateboolDeleteProduct(int id){
returntrue;
}
Add a Delete Button
Each row in your table should have a Delete button (Figure 1). Add that button now by adding a new <th> within the <thead> tag.
<th>Delete</th>
Modify the productBuildTableRow function and add the following code immediately before the closing table row tag ("</tr>").
In the code that builds the delete button, the onClick event calls a function named productDelete. Pass this to the productDelete function so that it can use this reference to retrieve the value of the product ID contained in the data-id attribute. The Ajax call sets the URL to include the ID of product to delete and sets the type property to DELETE. Upon successfully deleting a product, remove the complete row from the HTML by finding the <tr> tag that contains the current delete button and calling the remove() method on that table row.
functionproductDelete(ctl) {
var id = $(ctl).data("id");
$.ajax({
url: "/api/Product/" + id,
type: 'DELETE',
success: function (product) {
$(ctl).parents("tr").remove();
},
error: function (request, message, error) {
handleException(request, message, error);
}
});
}
Summary
In this article, you learned the various HTTP verbs GET, POST, PUT, and DELETE and how to use them to create add, edit, delete, and list Web pages. What’s nice about combining the Web API with pure HTML is that you’re not performing full postbacks to the server, rebuilding the whole page, and then resending the whole page back down to the client browser. This comes in very handy on mobile devices where your user may be on a limited data connection through a service provider. The less data you send across, the fewer minutes and gigs of data you use on mobile phone plans. In the next article, you’ll see some methods for handling validation and error messages.
Sample Code
You can download the sample code for this article by visiting my website at http://www.pdsa.com/downloads. Select PDSA Articles, then select "Code Magazine—CRUD in HTML using the Web API" from the drop-down list.
Listing 1: Create some mock data for your Web API
privateList<Product> CreateMockData()
{
List<Product> ret = newList<Product>();
ret.Add(new Product()
{
ProductId = 1,
ProductName = "Extending Bootstrap with CSS,
JavaScript and jQuery",
IntroductionDate = Convert.ToDateTime("6/11/2015"),
Url = "http://bit.ly/1SNzc0i"
});
ret.Add(new Product()
{
ProductId = 2,
ProductName = "Build your own Bootstrap Business
Application Template in MVC",
IntroductionDate = Convert.ToDateTime("1/29/2015"),
Url = "http://bit.ly/1I8ZqZg"
});
ret.Add(new Product()
{
ProductId = 3,
ProductName = "Building Mobile Web Sites Using
Web Forms, Bootstrap, and HTML5",
IntroductionDate = Convert.ToDateTime("8/28/2014"),
Url = "http://bit.ly/1J2dcrj"
});
return ret;
}
Listing 2: The default methods in the controller need to be modified.
// GET api/<controller>public IEnumerable<string> Get()
{
returnnewstring[] { "value1", "value2" };
}
// GET api/<controller>/5publicstringGet(int id)
{
return"value";
}
// POST api/<controller>publicvoidPost([FromBody]stringvalue)
{
}
// PUT api/<controller>/5publicvoidPut(int id, [FromBody]stringvalue)
{
}
// DELETE api/<controller>/5publicvoidDelete(int id)
{
}
Listing 3: Get a single product
[HttpGet()]public IHttpActionResult Get(intid)
{
IHttpActionResult ret;
List<Product> list = new List<Product>();
Product prod = new Product();
list = CreateMockData();
prod = list.Find(p => p.ProductId == id);
if (prod == null) {
ret = NotFound();
}
Else {
ret = Ok(prod);
}
return ret;
}
Listing 4: Get the product ID and use Ajax to get a single product object
functionproductGet(ctl) {
// Get product id from data- attributevar id = $(ctl).data("id");
// Store product id in hidden field
$("#productid").val(id);
// Call Web API to get a list of Products
$.ajax({
url: "/api/Product/" + id,
type: 'GET',
dataType: 'json',
success: function (product) {
productToFields(product);
// Change Update Button Text
$("#updateButton").text("Update");
},
error: function (request, message, error) {
handleException(request, message, error);
}
});
}